Across all organizations, brazing can typically represent the most challenging process within the tool-making production cycle. With care, sufficient knowledge and attention to detail, however, the brazing process can be stabilized.
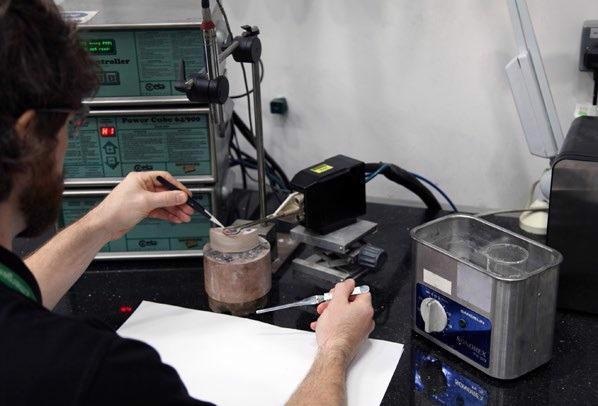
Image Credit: Element Six
Of course, the end user is spoiled for choice when it comes to selecting techniques for achieving an effective braze joint. There’s always a process to offer the desired outcome, whether that’s through induction, the use of a furnace, resistance heating or active or non-active brazing.
Element Six does not recommend the use of direct flame for heating due to superhard materials’ relative sensitivity, as precisely controlling the temperature can be difficult.
It’s important that time is taken to design the joint before heat is applied. Segment relief, pocket shape and size, choice of alloy and format, the correct size of segment, atmosphere, correct flux and heating regime are all critical.
Preparation Prior to Heating
The two aspects to consider when designing a braze joint are, firstly, keeping the temperature as low as reasonably possible, and secondly, the location, size and shape of the superhard element of the segment. The braze alloy selected for the application will determine the peak temperature.
It is vital to ensure that the superhard element of the segment has the correct relief, either through the pocket or engineering the segment itself, to eradicate cracking and premature failure. Figure 1 displays potential relief option examples.
Alloy suppliers can provide information for braze alloys and the resulting joint strength. In conjunction with the tool and joint designs, alloy formats can vary: with foil and paste the most common and easy to handle.
Please note that certain pastes require refrigeration to prolong shelf life, so ensure to check with the supplier.
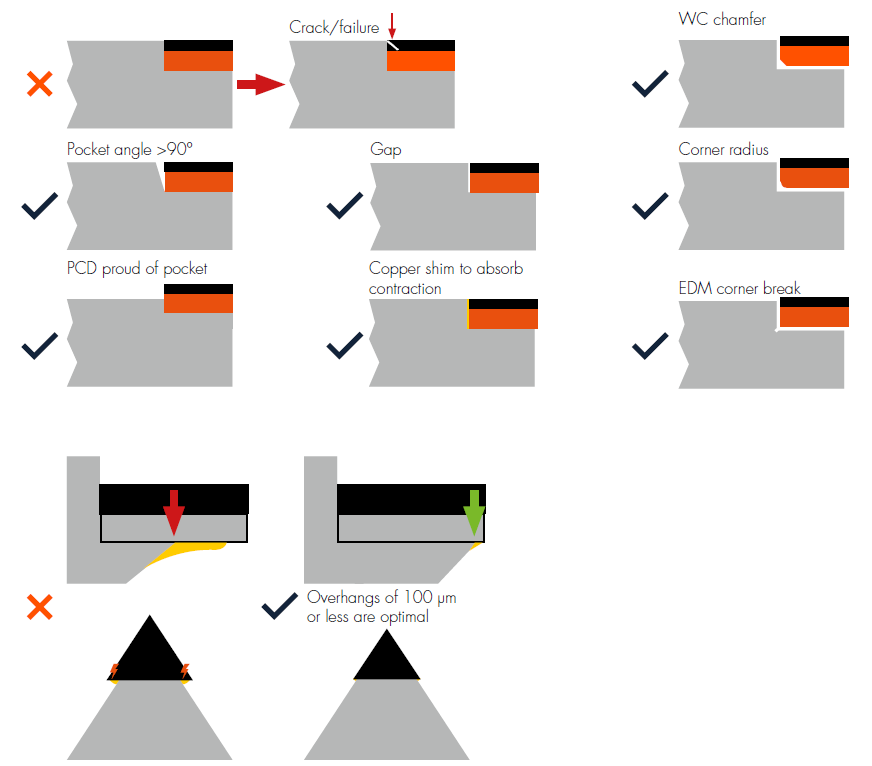
Figure 1. Examples of segment/pocket relief styles. Image Credit: Element Six
When all the parts of the joint have been prepared (superhard segment, tool body along and braze alloy), they must be suitably cleaned. Prior to brazing, foil braze alloy may need mechanical abrasion to remove oxidization.
The final step should be cleaning all parts in an ultrasonic bath using alcohol, and subsequently allowing them to air dry. It is essential not to use highly acidic or alkaline cleaning media.
To achieve good quality joints, correct flux choice is imperative. Flux operates to remove surface oxides on carbide surfaces along with preventing oxidation during the heating process. Figure 2 demonstrates the importance of using flux. Advice can be sought from braze alloy suppliers on selecting a flux in conjunction with the alloy.
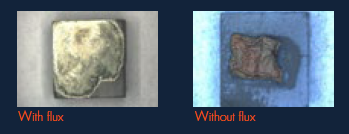
Figure 2. Examples of the importance of using flux. Image Credit: Element Six
It is essential not to use highly acidic or alkaline cleaning media as they can damage the superhard segment and trigger premature failure.
Figure 2 displays the importance of using flux. Once flux has been applied, the braze alloy has flowed across the WC surface well and retained its color as it is prevented by oxidization.
Where flux has not been applied, the alloy has oxidized and darkened in color, along with simply shrinking and sitting on top of the WC surface (given that no chemical reaction has taken place).
Heating and Cooling
Careful assembly of clean parts is required prior to heating. Do not touch the clean parts with bare skin once cleaned; instead, assemble using gloves or tweezers. Depending on the tool type, users may need to use custom-made jigging to hold the tool body appropriately.
Starting with the pocket in the tool body, coat all the surfaces of the joint in flux. Don’t forget to coat the braze alloy itself, then move onto the bottom surface of the superhard segment. Please note that flux is often combined with alloy for easier assembly when using a paste, so it’s important to check with the supplier.
The tools to be brazed should be placed on a suitable insulating bed. A portable holder is required if using a vacuum furnace for transfer to the furnace. Ensure access during heating using insulated tweezers if using induction or resistance heating, as the segment may move.
A generic heating cycle is displayed in Figure 3, where the flux enters its working temperature just before the braze alloy becomes liquid. Hold for ~5-10 seconds once at peak temperature to allow the alloy to flow throughout the joint.
On larger joints, longer soak time may be needed. It may be helpful to move the segment slightly during this hold period, using tweezers to promote flow.
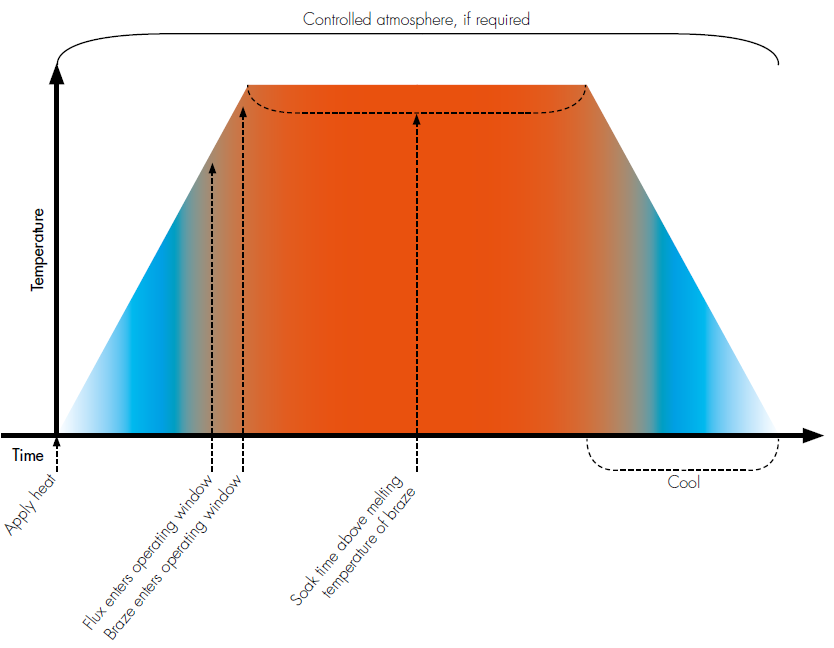
Figure 3. Standard brazing cycle, suitable for non-active brazing alloys. Image Credit: Element Six
Carefully move the tool once heating is complete to a suitable location to cool. No other method of actively cooling the tool should be applied (e.g., quenching): instead, leave to air cool or submerse in sand.
Clean the brazed part in warm water once it has cooled, taking care to brush off any residue. Do not chemically clean the brazed part or undertake bead or grit blasting as such methods can damage the superhard segment.
Perform a visual inspection after brazing and cleaning. Users should look out for: chipping, cracking, good braze flow, delamination, uniform braze thickness, voids in the braze and segment alignment. Figure 4 demonstrates examples of bad brazing.
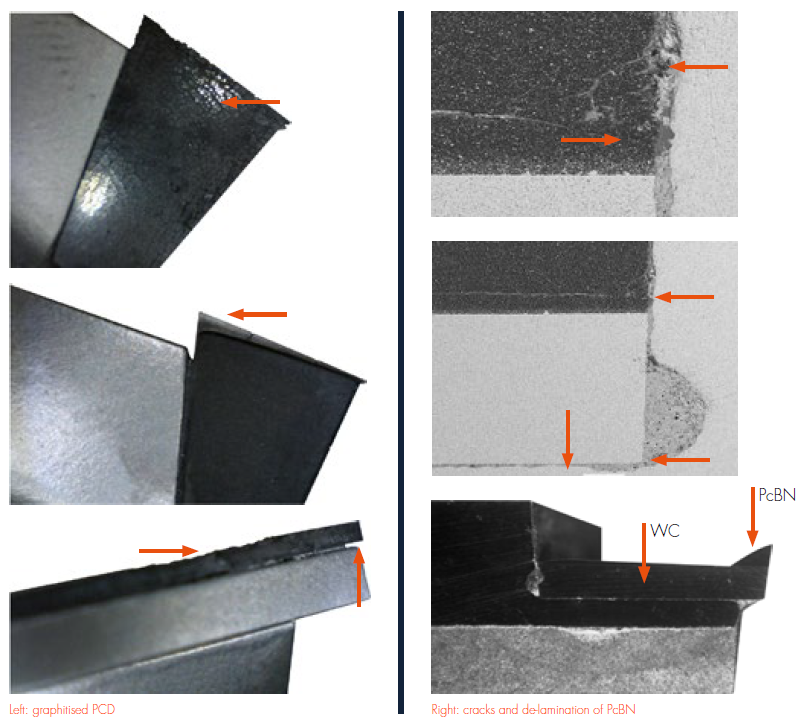
Figure 4. Examples of bad brazing. Image Credit: Element Six
The Results
If the brazing process is well-designed, users can rest assured that it should repeatedly and consistently produce a good-quality braze joint. For a successful brazing process, it is vital to prioritize attention to detail and clean surfaces.
It is also important to work closely with the braze alloy supplier to check the details of the process, together with the braze alloy selected and the users requirements. Even though the superhard segment is the key focus, it shouldn’t be a constraining factor when it comes to achieving a repeatable manufacturing process.
By working closely with the braze alloy supplier and with Element Six and following the steps detailed in this case study, users will find that superhard materials can be brazed without any issue.

This information has been sourced, reviewed and adapted from materials provided by Element Six.
For more information on this source, please visit Element Six.