As one of the world’s leading manufacturers of professional optical and digital products for medicine, science, and industry, Olympus celebrates 100 years of innovation in 2019. Olympus provides comprehensive microscope solutions in the materials science, life science, industrial research, and manufacturing fields, and continues to develop systems and software to meet customers’ evolving analysis needs.
In this interview, Olympus’ Dr. Mina Hong discusses the benefits of using 3D laser scanning confocal microscopes for surface metrology. See what she has to say about precision, ease of use, and other capabilities that make confocal microscopes invaluable inspection tools.
What is a 3D laser confocal microscope, and what can it do?
A laser confocal microscope uses a laser as the light source instead of white light. It puts a spatial pinhole in the reflection light path to block out-of-focus light, including light reflected and scattered from the sample. The pinhole design helps eliminate blurry features, providing an image with sharp contrast. Then the microscope uses the laser beam to faster scan the sample surface and reconstructs 3D data.
You can easily use laser scanning confocal microscopes to quantify surface geometry, such as surface roughness, depth, and height measurements. Today, laser scanning confocal microscopes have become popular inspection tools in both research laboratories and manufacturing production lines.
What are the advantages of using a laser confocal microscope compared to other surface imaging techniques?
The measurement scale of a laser scanning confocal microscope overlaps with other surface imaging techniques, such as optical light microscopy, scanning electron microscopy, and atomic force microscopy. However, our confocal microscopy solutions provide several distinct advantages:
- Requires minimal sample preparation with no polishing or coating needed.
- Easily accommodates larger samples in a wide range of shapes, including a 300 mm wafer or 210 mm tall part.
- Easy to maintain with no consumables expense.
- Provides nondestructive measurements to prevent damage or contamination to the sample surface.
- Easy and fast to use, so operators of all experience levels can acquire a high-resolution 3D image of the sample surface in just a few seconds.
All these benefits make the laser confocal microscope a useful tool for surface characterization.

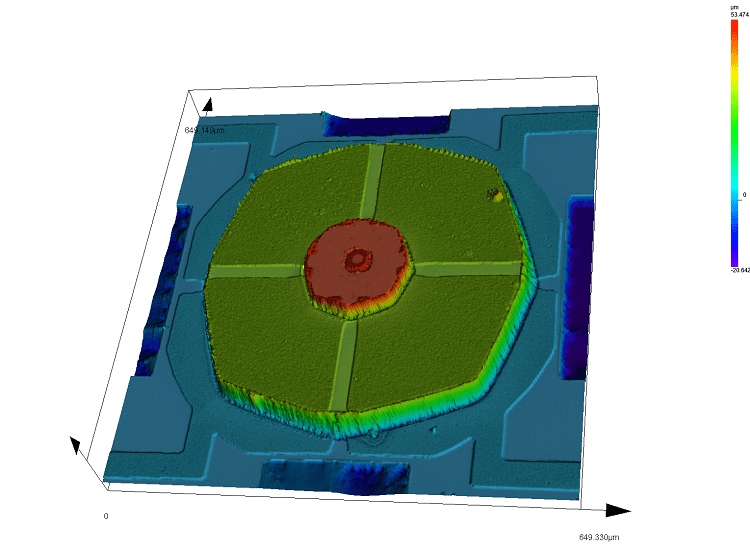
MEMS Scanner in 3D
What is the resolving power of a laser confocal microscope?
Our LEXT™ OLS5000 3D confocal microscope with a 405 nm laser can easily resolve 120 nm horizontal and 6 nm vertical.
Do you need much user experience to get a high-quality image from a laser confocal microscope compared to other surface imaging techniques?
Not at all. Unlike techniques that require users to understand the working principle and optimize imaging parameters, the laser confocal microscope is easy to use. Using Olympus’ OLS5000 laser confocal microscope as an example, the system can automatically adjust brightness, focus, and mapping while optimizing the parameters during the 3D scan to produce a high-quality image. Novice users can get the same high-quality images as experienced users.

The LEXTOLS5000 Laser Confocal Microscope
Can Olympus’ laser confocal microscope perform roughness measurements?
Yes, absolutely. Today, optical topography measurement is a popular technique because it is fast and nondestructive to sample surfaces compared to using a conventional stylus.
Olympus’ high-quality optics also produce high-quality data, so spike noise and other outliers can be correctly eliminated. The microscope’s data processing capabilities are another significant advantage. The imaging flexibility, precision, and low-noise characteristics deliver reliable measurement results essential to accurately analyze a wide range of surface textures.
We also provide built-in software modules with ISO standards to help users easily calculate linear or areal roughness measurements. Since 2011, Olympus has been a member of the Technical Committee of the International Organization for Standardization (ISO/TC 213), which was set up to promote the standardization of 3D surface measurement, as well as promote using 3D surface measurement in industry.
As part of our ongoing efforts to contribute to the advancement of manufacturing in Japan, Olympus will continue to offer 3D surface measurement solutions compliant with international standards.
Sometimes users want to image samples in a larger field of view. Can the Olympus LEXT confocal microscope do that?
With the motorized stage, our LEXT confocal microscope can easily stitch up to 2,500 3D images. Using a 5X objective, for example, we can create a stitched image of 4 inches of water. Olympus also offers dedicated LEXT objectives that compensate for both spherical and chromatic aberrations, so you get accuracy and repeatability in single images as well as large stitched images.

Example of stitching on an image of a hard drive
Can Olympus’ laser confocal microscope be automated?
The inspection workflow, from data acquisition and measurement to report creation, can be automated, along with all acquisition commands. You can easily create or edit inspection procedures using a built-in software feature called Macro Production Tool. Operators can run the registered macro file and obtain reliable measurement results with a single click.
About Dr. Mina Hong
Dr. Mina Hong is an application scientist at Olympus, specializing in industrial microscopes. She holds a Ph.D. in chemistry and has worked in material science and surface characterization for more than eight years. With technical knowledge and experience in atomic force microscopy, light microscopes, digital microscopes, laser confocal microscopes, and scanning electron microscopes, Mina actively works with material scientists and engineers in industry and academia.


This information has been sourced, reviewed and adapted from materials provided by Evident Corporation.
For more information on this source, please visit Evident Corporation.
Disclaimer: The views expressed here are those of the interviewee and do not necessarily represent the views of AZoM.com Limited (T/A) AZoNetwork, the owner and operator of this website. This disclaimer forms part of the Terms and Conditions of use of this website.