This article presents diesel engine oil analysis data that demonstrates the application of filtergram particle quantifier X-ray fluorescence (FPQ spectroscopy) to evaluate the severity of wear and pollution.
Each filtergram specimen undergoes two independent measurements: pore blockage particle count and FPQ spectroscopic big particle elemental analysis. Causal inflections in ASTM D7720 cumulative distributions represent severity criteria for FPQ spectroscopic elemental analyses.
Key Points
- The Filtergram Particle Quantifier (FPQ) counts and codes particulate material on filtergrams larger than 4 microns.
- FPQ spectroscopy provides elemental analysis of particulate debris on each filtergram specimen.
- Determine wear and contamination severity using particle count and elemental analysis of debris larger than 4 microns, such as Fe, Cr, Ni, Cu, Sn, Pb, Al, and Si.
- Filtergram specimens save wear debris for future reference, defect removal, and root cause failure analysis (RFCA).
This article uses ASTM D8127 FPQ spectroscopy to assess abnormal wear caused by iron alloys, white metal alloys, and yellow metal alloys in a population of 52 in-service diesel engine oil samples.
These in-service oil samples were evaluated using the FPQ pore obstruction particle counting method, which collects and retains particulate matter larger than 4 microns on the filtergram specimen.
Each filtergram was nondestructively tested with energy dispersive X-ray fluorescence (XRF) to determine the elemental composition, including iron (Fe), chromium (Cr), nickel (Ni), copper (Cu), lead (Pb), and tin (Sn), to quantify abnormal wear from hundreds of moving engine components in each engine oil sample.
Engine oil analysis globally relies on optical emission spectroscopy (OES) to detect elements such as Fe, Cr, Ni, Cu, Pb, Sn, and Si to assess abnormal wear and contamination. However, OES has limitations in differentiating abnormal wear and dust contamination due to its sensitivity range.
Specifically, OES is challenged by: 1) the presence of numerous benign sources of these elements across the molecular to micron size spectrum, and 2) the fact that severe wear and dust contamination often involve particles larger than what OES can effectively measure.
The OES measurement range detects all seven of these components in engine oil from various sources.
For example, "increasing copper concentrations can reach much beyond 300 ppm. As scary as this may sound, copper sulfide, even at high concentrations, has been reported to be typically innocuous and may not be connected with (cause or influence) cooler failure, increased wear, or lubricant oxidation.
Copper in diesel engine lubricants can come from a variety of sources and exist in different states. From the standpoint of an oil analyst, knowing the source, nature, and state of copper is critical to correctly interpreting the warning in terms of engine reliability and responding appropriately.
Although extremely useful, [OES] elemental analysis has limited capabilities and may cause false alarms or hide true alerts unless other tests are conducted concurrently or on an exception basis."
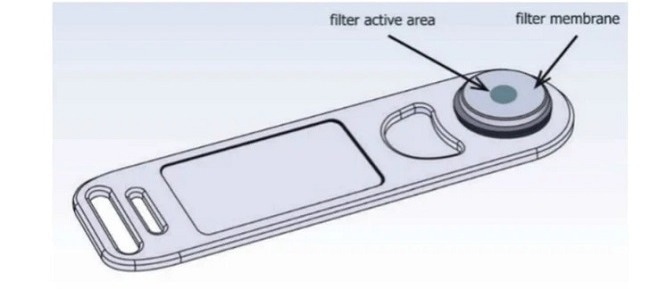
Figure 1. Filtergram for collection of > 4-micron wear debris from in-service oil samples. Image Credit: AMETEK Spectro Scientific
FPQ spectroscopy conducts pore blockage particle counting and then performs multi-elemental analysis using energy dispersive X-ray fluorescence, in accordance with ASTM D7684, ASTM D8127, and ISO 21018-3 standards.
Figures 1 and 2 illustrate the active region of the 4-micron filter membrane on the filtergram particle quantifier (FPQ) where wear debris is collected. After labeling the FPQ specimen and completing the elemental analysis, the specimen is preserved for potential future visual and microscopic examination.
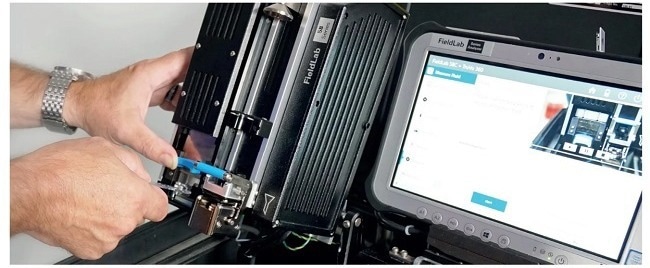
Figure 2. Inserting FPQ Filtergram specimen in position for the elements module for analysis by XRF on the active filter area. Image Credit: AMETEK Spectro Scientific
Figure 3 depicts the two-step procedure for extracting > 4-micron particulates from in-service oil samples and determining the elemental composition of debris collected on the filter's active surface.
The benefits of this two-step method include:
1. Fast, Solvent-free Method
- No requirement for dilution or acid digestion sample preparation
- Suitable for field use
- Provides uniform particle presentation with measured volume for PPM concentration computation
2. Powerful Data for Advanced Wear Detection
- Provides particle count measurement findings
- The non-destructive FPQ test measures 16 elements in parts per million (PPM), including Fe, Ag, Al, Cr, Mg, W, V, Cu, Ni, Pb, Si, Sn, Ti, Mo, Co, and Zn
- Preserves the specimen and debris for future analysis
- Compatible with other methods for assessing big particles
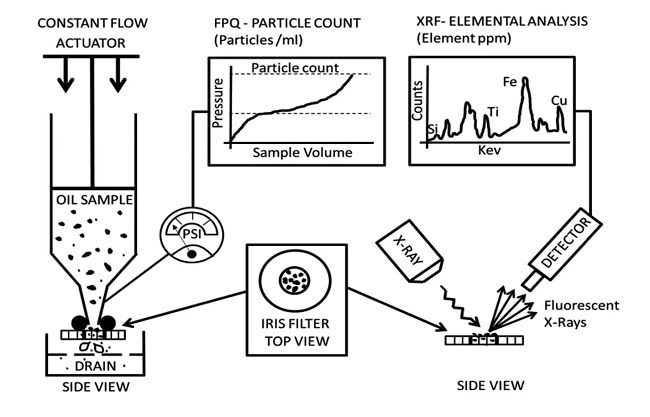
Figure 3. Filtration Particle Quantifier (FPQ) Technique (ASTM D8127). Image Credit: AMETEK Spectro Scientific
Severe Wear Debris
Severe sliding, rolling fatigue, and bending fatigue are failure mechanisms that drastically reduce the lifespan of machine components. Each mechanism causes cumulative and progressive damage.
The wear debris resulting from these mechanisms provides crucial insights into the damaged component, the nature of the damage, and the stage of failure progression. Figure 4 illustrates varying levels of wear severity: benign severe, advanced, and catastrophic wear.
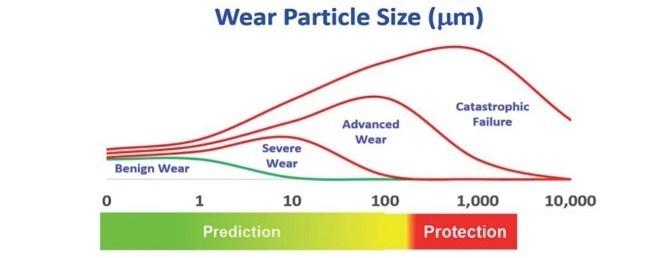
Figure 4. Diagram of wear particle sizes ranging from sub-micron to very large millimeter range. Image Credit: AMETEK Spectro Scientific

Figure 5. Example images of abnormal abrasion, adhesion, and fatigue wear debris. Image Credit: AMETEK Spectro Scientific
Abnormal abrasion, adhesion, and fatigue, depicted in Figure 5, involve large wear particles rather than just metal oxides.
- Microspall particles range between 10 microns and 50 microns.
- Laminar particles and chunks range from 50 microns to several hundreds of microns.
- Optical emission spectroscopy is blind to large particles.
The Filtergram Particle Quantifier (FPQ) measures particle count and ISO code for solid debris larger than 4 microns accumulated on a filtergram, capturing key stages of wear from severe to catastrophic. Figure 4 shows wear debris size ranges. To predict impending catastrophic failure, it is essential to measure wear debris in the size range that OES cannot detect, from 4 microns to 2 millimeters.
Severity Limits for FPQ XRF and OES Data
A total of 52 in-service engine oil samples were evaluated utilizing filtergram FPQ and OES. The ASTM D7720 cumulative distributions presented in Figure 6 were then used to determine preliminary severity limits.
Preliminary FPQ spectroscopic severity limits for Fe, Cr, and Ni were used to measure abnormal wear on cylinders, piston rings, gears, shafts, timing wheels, timing chains, valve tappets, guides, crankshaft, camshaft, rocker arm shaft, piston pins, roller bearings, and oil pump.
Furthermore, early FPQ spectroscopic severity limits for Cu, Sn, Pb, and Al were used to quantify the running surfaces of connecting rod bearings, rocker arm shafts, and piston pin bearings, while Si measures air intake dust.
The OES severity thresholds mentioned in this research are acknowledged industry standard alert limits.
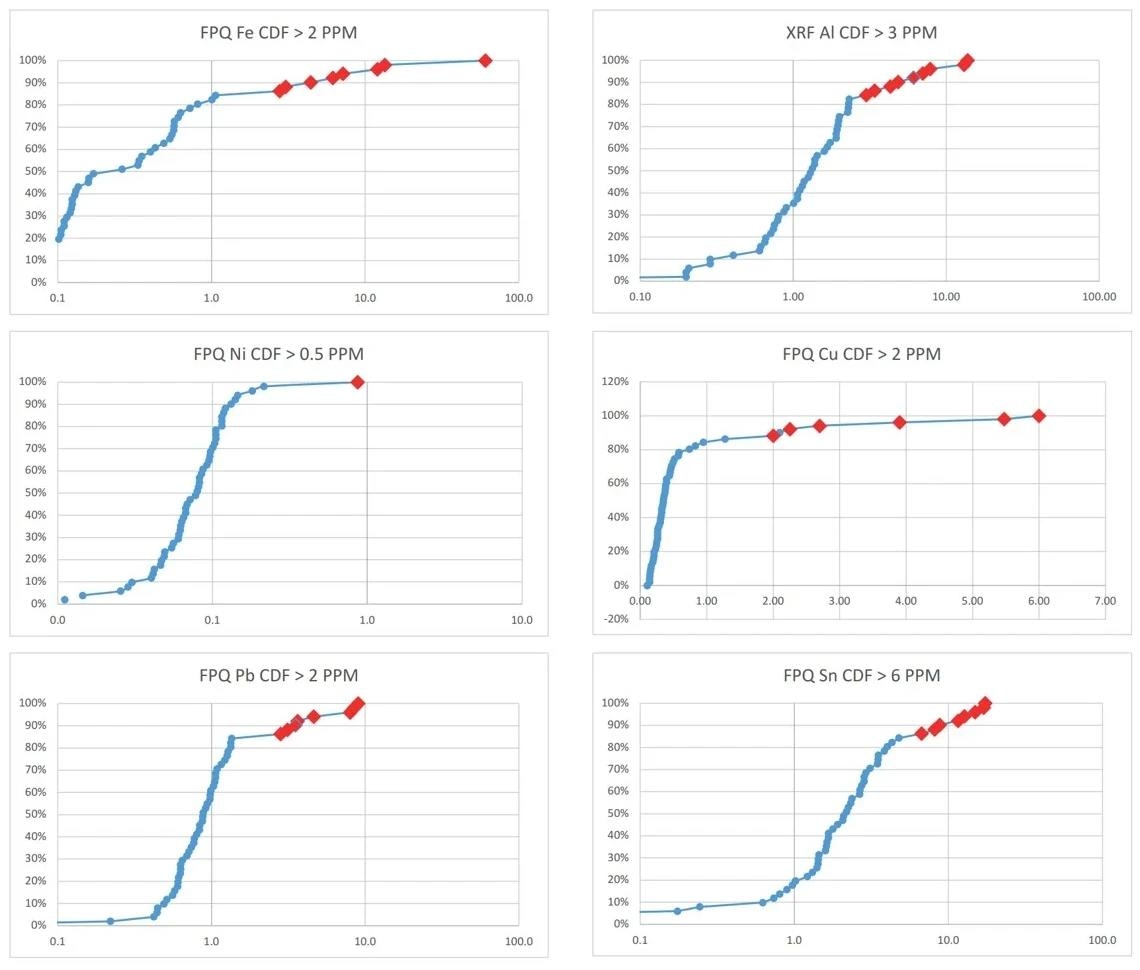
Figure 6. Cumulative distribution severity limits for FPQ Fe, Cr, Ni, Cu, Sn, and AI for this population of diesel engines. Image Credit: AMETEK Spectro Scientific
Root Cause Failure Analysis
The main procedures for in-service oil examination of ferrous and non-ferrous wear debris in the OES blind region (> 4-micron to 2-millimeter range) are analytical ferrography (AF), rotating filter spectroscopy (RFS), scanning electron microscopy (SEM), and acid digestion.
Occasionally, one of these time-consuming procedures is utilized for a specific purpose, such as root cause failure analysis.
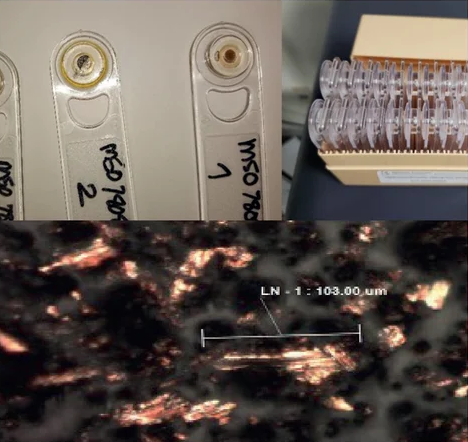
Figure 7. Container for FPQ filtergrams with an example micrograph image. Image Credit: AMETEK Spectro Scientific
Filtergram specimens (see Figure 7) are stored and available for:
- Retest and comparison
- Microscopic wear debris analysis
- Future investigation
- Case history example
- Defect elimination
Conclusion
This article provides preliminary severity limitations for ferrous and non-ferrous alloy metal components based on 52 diesel engine oil samples.
Preliminary FPQ spectroscopic severity limits for Fe, Cr, and Ni measure abnormal wear on cylinders, piston rings, gears, shafts, timing wheels, timing chains, valve tappets, guides, crankshaft, camshaft, rocker arm shaft, piston pins, roller bearings, and oil pump.
The preliminary FPQ severity limits for Cu, Sn, Pb, and Al quantify the running surfaces of connecting rod bearings, rocker arm shafts, and piston pin bearings, whereas Si measures air intake dust.
FPQ filtergram specimens can be kept and used for retesting, future reference, defect elimination, and Root Cause Failure Analysis (RCFA).

This information has been sourced, reviewed and adapted from materials provided by AMETEK Spectro Scientific.
For more information on this source, please visit AMETEK Spectro Scientific.