Microscope calibration ensures measurements are taken accurately and consistently for inspection, quality control (QC), failure analysis, and research and development (R&D). This article outlines the key steps for calibration. Using a reference, calibration helps to enable reproducible results and ensure agreement with standards and guidelines. To obtain consistent and accurate results, microscope calibration should be checked regularly. Support can be obtained from calibration experts if necessary.
Why Microscope Calibration is Important
Accuracy and Reliability
Calibration is the process of adjusting and verifying that an instrument, for example, an optical microscope, is taking measurements accurately by comparing them to a known measurement standard or reference. This is crucial because accuracy determines how close an instrument's measurement is to the true or accepted value.
A properly calibrated microscope provides consistent, accurate results within the specified tolerance. Calibration can also reduce or eliminate system errors, thereby improving precision. Optical microscopes can measure micrometer-scale distances and resolve fine details, so calibration is crucial for obtaining accurate measurements and should be performed regularly.
What Influences Accurate and Reliable Results
Several factors can introduce errors or inconsistencies in microscope measurements. These include: incorrect use of the microscope, improper setup, varied environmental conditions in the laboratory, and the microscope being used by multiple users for different applications.
To ensure that results stay reliable and consistent for all microscope users, as well as regular calibration, the following actions should be taken:
- If there are changes in configuration or setup as a result of the microscope being used for multiple purposes or by multiple people, these should be counteracted to to minimize system errors.
- A stable environment should be maintained wherever the microscope is used, including temperature, humidity, etc.
- Any unwanted or unexpected changes, such as misalignments or drifts, should be corrected during use.
- The microscope should be operated within its specified limits and in accordance with the chosen guidelines and standards.
Fulfilling Guidelines and Standards
Microscope calibration can also help ensure that regional, international, and organizational guidelines/ standards for specific applications are met. Certain guidelines or standards, such as ISO, EN, ASTM, DIN, etc., sometimes require certification that instruments are calibrated.
How to Calibrate a Microscope
Different Types of Optical Microscopes
Optical microscopes are available with different optical systems, such as zoom optics in stereomicroscopes or fixed optics in compound microscopes (Figure 1).1,2 There are also digital microscopes that feature an integrated microscope camera, rather than an eyepiece.3 Conventional microscopes have eyepieces, but it is often possible to install a digital camera as well. A range of high-quality stereo, compound, and digital microscopes is available from Leica Microsystems, along with cameras for digital microscopes.
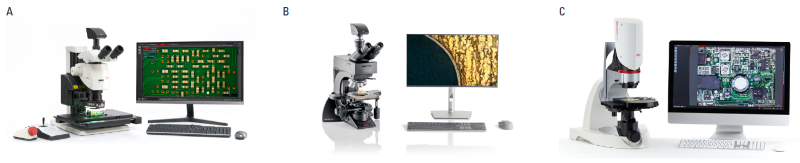
Figure 1. Examples of a: A) M205 C stereo microscope with zoom optics; B) Visoria M materials compound microscope with fixed optics; and C) DVM6 digital microscope. Image Credit: Leica Microsystems GmbH
For these microscopes to measure accurately and reliably, they require calibration, which can be performed using a similar procedure for each type. Today, measurements are usually taken using a digital microscope camera, so calibration is performed using the camera’s live image displayed on a monitor.
Step-by-Step Calibration Guide
As mentioned, microscopes often measure by creating a digital image on a monitor. Before the microscope is calibrated, the user must ensure that the camera is working properly. Generally, a microscope can be calibrated with the software by following these steps:
Step 1: The user should locate and open the calibration settings in the microscope software before using the microscope camera at its highest pixel resolution and confirming that the pixels are not binned.
Step 2: Add a new calibration file.
Step 3: An appropriate measurement reference, such as a stage micrometer or ruler with a precise scale, should be placed on the microscope stage and brought into sharp focus at a specific magnification value (Figure 2).
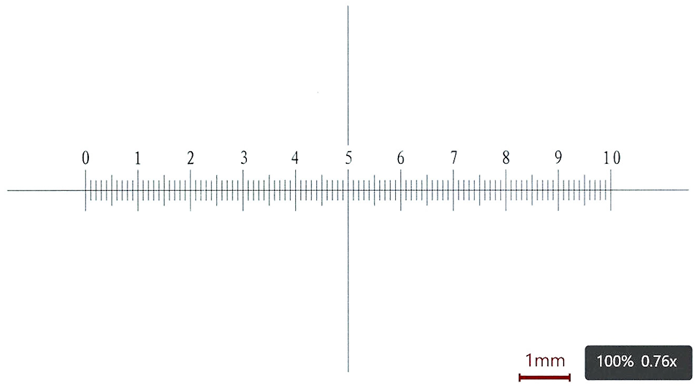
Figure 2. An image in sharp focus of a stage micrometer at low magnification, which will be used for calibration. Each division is 0.1 mm. Image Credit: Leica Microsystems GmbH
Step 4: Next, the distance line in the live image requires adjustment so that it matches the corresponding marks on the reference, which correspond to the desired length, and the length being measured in the software calibration settings must be indicated (Figure 3).
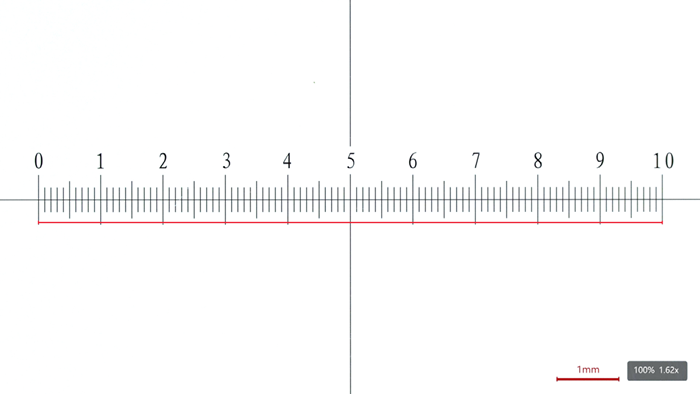
Figure 3. At a lower magnification value, a line in the live image is used to indicate a distance on the stage micrometer to perform calibration. Image Credit: Leica Microsystems GmbH
Step 5: The magnification should then be changed to the appropriate higher values, depending on whether the user has a microscope with zoom or fixed optics. Step 4 is then repeated for each magnification (Figure 4). For accurate calibration at higher magnification values, it is paramount to verify that the distance line starts and ends on the same side or edge of the stage micrometer mark, for example: from the left (or right) edge to the left (or right) edge (Figure 4C).

Figure 4. A-C: Calibration with the same stage micrometer at various magnification values. Image Credit: Leica Microsystems GmbH
Step 6: Finally, the user should confirm the calibration so that the software saves the data. A calibration report can be completed for documentation (Figure 5).
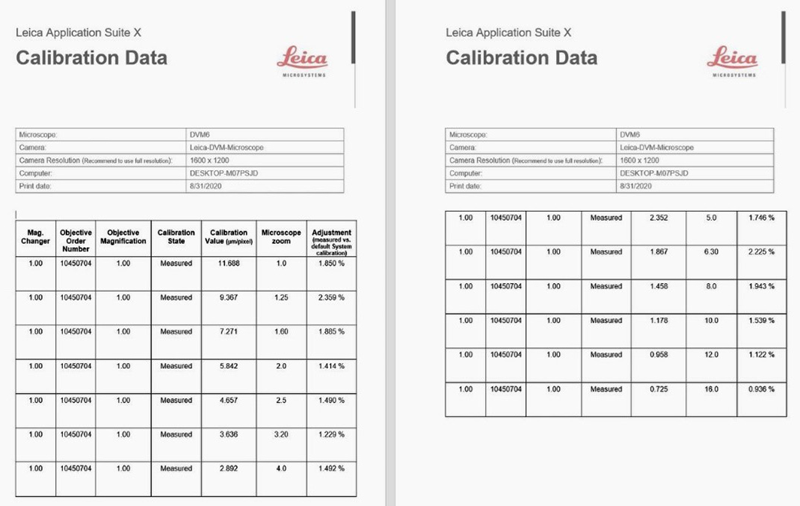
Figure 5. A calibration report can be created using a template available with Leica microscopes. Image Credit: Leica Microsystems GmbH
Important point: After calibration, verify that it was performed effectively by making a precise distance measurement directly on the measurement reference.
Useful Microscope Accessories for Calibration
These recommended accessories can aid the user when performing microscope calibration:
- Lint-free tissues and solutions to clean the optics, such as the objective lens, for a clear live image of the reference.
- A micrometer screw position system enabled precise horizontal movement of the reference on the stage.
- A microscope stage with fine focus.
Professional Calibration Service
Leica Microsystems and its partners offer periodic calibration services to allow users to trace a microscope’s accuracy to known standards across a long period of time. To demonstrate reliability, accuracy, and readiness for use, the microscope’s measurement results are compared with a calibrated test slide or a stage micrometer. For some users, it can be cost-effective and timesaving to take advantage of such a service. In some industries and fields, a certified calibration service is necessary for certain instruments. The frequency of calibration is usually dependent on the application or industry, but it is generally performed just after installation, repairs, and upgrades, and repeated once annually.
Summary and Conclusions
Calibration helps ensure accurate, consistent results by comparing microscope measurements to a known reference or standard and adjusting them accordingly, thereby increasing users’ confidence in the measurements. Calibration is sometimes also required for accordance with organizational, regional, or international guidelines or standards.
A calibrated microscope is crucial for applications and industries such as inspection, QC, failure analysis, R&D, and scientific research across automotive, aerospace, electronics, and medical device sectors. Microscope calibration can be performed by users directly or by professional teams, such as those offered by Leica Microsystems. It is recommended that calibration be performed straight after a microscope is installed, repaired, or upgraded, and repeated at least once a year.
Acknowledgments
Produced using materials originally authored by David Barbero, James DeRose, and Nicholas Baker from Leica Microsystems.
References
- Ippel, E., et al. (2023). Key Factors to Consider When Selecting a Stereo Microscope. (online) Leica Microsystems. Available at: https://www.leica-microsystems.com/science-lab/applied/key-factors-to-consider-when-selecting-a-stereo-microscope/.
- Rühl, H. (2012). Optical Microscopes – Some Basics. Leica Microsystems. (online) Available at: https://www.leica-microsystems.com/science-lab/microscopy-basics/optical-microscopes-some-basics/.
- DeRose, J. (2023). Digital Inspection Microscope for Industrial Applications. Leica Microsystems. (online) Available at: https://www.leica-microsystems.com/science-lab/applied/digital-inspection-microscope-for-industrial-applications/.

This information has been sourced, reviewed and adapted from materials provided by Leica Microsystems GmbH.
For more information on this source, please visit Leica Microsystems GmbH.