Stereo microscopes are often the first choice when high-quality 3D perception of samples is required in the lab or an industrial facility. Users will frequently spend hours looking through the eyepieces, inspecting, observing, documenting, or dissecting samples. A microscope must be chosen carefully to ensure that the microscope fits the needs of the users.
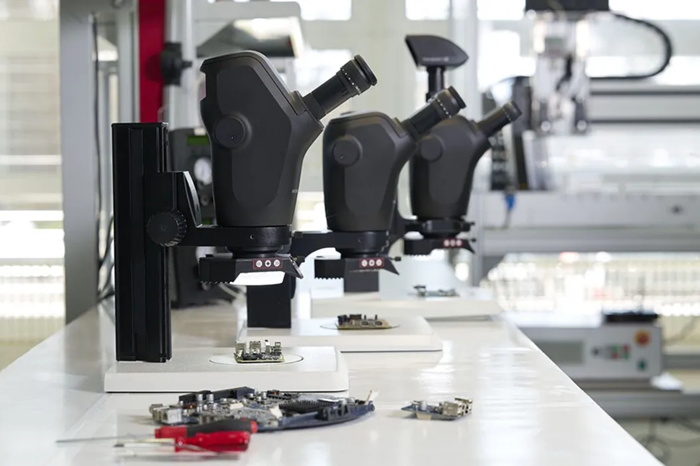
Stereo microscopes are often considered the workhorses of laboratories and production sites. Image Credit: Leica Microsystems GmbH
This article provides advice to users and encourages the thorough assessment of their microscopy requirements before picking the right microscope for them.
It also covers the essential elements that determine a stereo microscope's performance, which is useful for user applications.
When is a Stereo Microscope a Good Option?
Stereo microscopes are distinct from other microscopes as they enable a 3D impression of the sample when viewed through the eyepieces. This makes them especially well-suited for quality control, inspection and rework, research and development, and failure analysis in industrial environments.
They are invaluable in life science research, for specimen sorting, screening, and handling, and for education in school and university classrooms and laboratories.
Step 1: Understand Your Needs
Before you begin the process of purchasing a stereo microscope, you should consider the sort of applications for which the microscope will be used as well as the location where it will be placed. These factors should have a significant impact on your decision.
Consider the Samples
What types of samples should be observed? Do you need to accommodate a wide range of samples, or is it the same type of sample with an overarching aim to achieve high throughput? What sample structures should be observed?
Do you need to inspect reflective samples, such as metal components or parts, or see through holes? How large will your samples be? Is fluorescence imaging necessary for life science applications?
The type and size of the samples you examine will affect which illumination to use, how much room is required under the objective lens, and which stage to select.
Consider the Application
What exactly should you do with your samples? Aside from observation, do you require documentation and measurements? Do you need to discuss the image or measurements with coworkers or students? Is it your responsibility to screen and sort the sample or to handle it while observing it under a microscope?
The answers to these questions will influence the choice of microscope in terms of configuration, such as whether a stand-alone solution with an on-screen display can be used, a separate monitor is preferable, sharing functionality is vital, or a camera is required for documentation.
Consider the Users
Will the microscope be shared, and if so, by how many? How long does each user spend working with the microscope?
Depending on the number of users, the microscope should swiftly adjust to each user's preferences and physical characteristics. If users spend long periods of time working with a microscope, ergonomic accessories is required to assist in preventing repetitive strain injuries.
Consider Your Budget
How many microscopes are required and how much can be spent?
Stereo microscopes are available for practically any budget. Knowing your budget will help you prioritize and choose a modular solution to meet the majority of your requirements.
While modular solutions may appear to cost more upfront, they can save you money in the long term thanks to their versatility, adaptability to different users, and wide range of accessories.
Step 2: Make an Informed Decision
When comparing choices, it is critical to understand the key aspects that influence the performance of a stereo microscope and the people who use it.
Below is a summary of the most important factors to consider. The bullet points highlight the most crucial aspects. The deep dives after the overview will provide further information on each of the mentioned aspects.
1. Zoom Range, Magnification, Object Field (Field of View), and Working Distance
- A stereo microscope's zoom range refers to the maximum and minimum magnification levels. Users who often work at the same magnification level do not require a wide zoom range. If the workflow involves handling samples beneath the objective or examining them for regions of interest, a wide zoom range may be advantageous, as it allows you to quickly transition from an overview to fine details.
- Eyepieces can alter the field of view or object field at a given zoom magnification level. A broader field of view enables users to maintain a better orientation on the sample.
- Working distance is the distance between the sample's top and the objective's front lens. A wider working distance is useful for inspection and rework, as well as specimen sorting, as it is more comfortable for handling a sample while studying it with the microscope.
2. Depth of Field, Resolution, and Numerical Aperture (NA)
- The depth of field refers to how much of a sample's vertical height consumers perceive as in focus.1 It has an inverse relationship with the numerical aperture, resolution, and magnification.
- Resolution refers to the amount of detail visible in a sample.2
- The numerical aperture is determined by the refractive index of the medium and the greatest angle of light gathered by a lens. A higher NA yields higher resolution but typically lower depth of field.1-3
- FusionOptics offers both higher resolution and a larger depth of field.4
3. Optical Quality
- Optical quality determines the accuracy of sample imaging.
- Chromatic and spherical aberration are optical phenomena that cause color fringes and image distortion.5
- Optical quality requirements vary based on the sample and work. For example, color-corrected optics are necessary to see true colors.
- Optics with better light transmission are recommended for visualizing small details on samples, such as for R&D applications.
4. Illumination
- Optimal illumination should equally illuminate the field of view, give high contrast, and reveal the sample's true colors. The article cited as reference 12 provides examples of various lighting setups and their effects on images.
- Ensure illumination is appropriate for the microscope and application.6
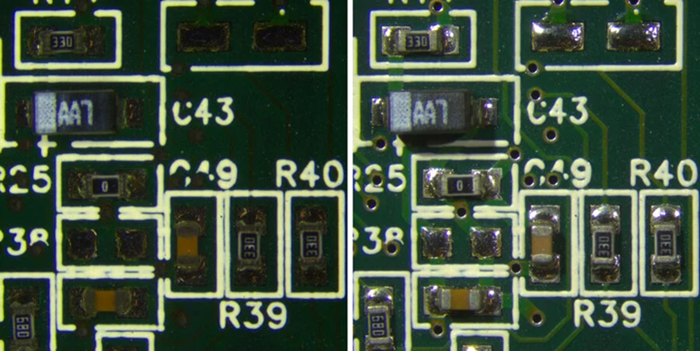
Figure 1. The illumination determines what can be seen in a sample. The images show a printed circuit board (PCB) imaged using a ring light with crossed polarizers (left) and spotlight illumination (right). The vias (holes) in the PCB are much more visible in the right image, but details on shiny metal surfaces are more visible, due to elimination of glare, in the left image. Image Credit: Leica Microsystems GmbH
5. Ergonomics
- Prolonged use of the eyepieces can cause strain and musculoskeletal issues. Such health difficulties can result in decreased concentration, inefficiency, or even absences from work.
- Ergonomic accessories promote proper posture when working with microscopes.7
- The microscope's adjustable features, including zoom and focus knobs, allow for customized operation and configuration, particularly for multiple users.
Deep Dive: Zoom Range, Magnification, Object Field (Field of View), and Working Distance
A stereo microscope's total magnification is calculated by adding the magnifying power of the objective lens, the zoom optics, and the eyepieces.8
The objective has a set magnification value. The zoom optics allow magnification to be adjusted across the zoom factor range. The eyepieces have a constant magnification value.
To get the overall magnification of the sample observed through the eyepieces, multiply the magnification factors of the objective, zoom optics, and eyepieces.
The formula for total magnification is: MTOT VIS = MO x z x ME, where:
- MTOT VIS is the total magnification (VIS stands for "visual");
- MO is the magnification of the objective (1x for the case of a Greenough microscope with no supplementary lens);
- z is the zoom factor; and
- ME is the magnification of the eyepieces.
In general, values for MO are between 0.32x and 2x, for z between 0.63x and 16x, and ME between 10x and 40x.
Influence of Magnification on the Field of View/Object Field
Looking through the eyepieces reveals a circular region known as the field of view (FOV).8
The total magnification determines the diameter of the field of view. For example, eyepieces with 10x magnification have a field number of 23. The field number indicates that at a combined magnification of 1x for the objective and zoom optics, the FOV visible through the eyepieces is 23 mm in diameter.
The working distance is the distance between the objective's front lens and the top of the sample when it is in focus. Typically, as magnification increases, the working distance of an objective decreases.
The working distance directly affects the usefulness of a stereo microscope, particularly for inspection, rework, and quality control tasks that require space to move the sample beneath the objective.
Deep Dive: Depth of Field, Resolution, and Numerical Aperture (NA)
Relationship Between Depth of Field, Magnification, and Resolution
The depth of field is regulated by an inverse relationship between numerical aperture, resolution, and magnification.1-3
The proper adjustment of a microscope's settings can achieve an optimum balance of depth of field and resolution for the best possible visualization of the sample.
Stopping down, or reducing the numerical aperture, can greatly enhance the depth of field, especially at low magnification. The goal is to determine the optimal balance of resolution and depth of field based on the size and shape of the sample features.
Optimal 3D Images with FusionOptics Technology
Leica Microsystems' FusionOptics technology provides a sophisticated optical method for stereo microscopes that allows both high resolution and a large depth of field simultaneously.4
One beam path has higher resolution and a smaller depth of field, while the other has lower resolution and a bigger depth of field. The human brain merges the two independent images into a single optimal image with high resolution and a large depth of field.
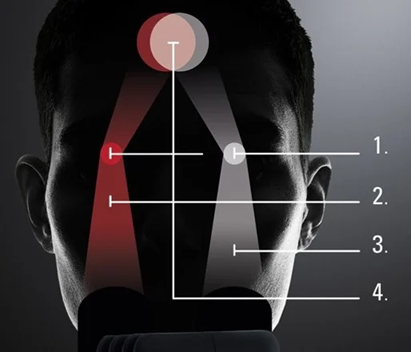
Figure 2. Stereo microscopes have two separate beam paths (1). With the FusionOptics technology, one beam path provides a large depth of field (2) and the other high resolution (3). The two images are merged into a single, optimal 3D image by the brain (4). Image Credit: Leica Microsystems GmbH
Deep Dive: Optical Quality
Achromatic or Apochromatic Lenses
Chromatic aberration is a type of distortion that occurs when a lens fails to focus all hues at the same convergence point. It arises because lenses have a varied refractive index for different wavelengths of light (lens dispersion).
Spherical aberration occurs when light rays strike a spherical lens surface at a position other than its center axis and are refracted to a greater or lesser degree than those that strike at points closer to the center.5
A good optical design should reduce or eliminate all chromatic and spherical aberrations. The following types of objective lenses can be used to lessen the impact of these issues:9,10
Achromat
- Chromatically corrected for two wavelengths (red and green) to focus in the same plane.
- Suitable for standard applications in the visual spectral range that prioritize geometrical aspects over true color rendition.
Apochromat
- Chromatically corrected for three wavelengths (red, green, and blue) to focus in the same plane.
- Suitable for applications in the visual spectrum range and beyond where color fringes can be disruptive, e.g., those that require quick color change and structure colocalization.
Plan
- Lenses that are not corrected for field flatness or planarity exhibit uneven focus over the full field of view.
- Correcting for image flatness is beneficial for applications that need wide fields of view.
Deep Dive: Different Types of Illumination
- Incident Light: Incident light is used for opaque or non-transparent materials. Depending on the sample texture and application requirements, a variety of incident illumination techniques are available to provide adequate contrast of sample details and features of interest.
- Transmitted Light: Transmitted light is used for transparent samples such as cells, model organisms, polymers, and glass.
- Standard Transmitted Brightfield Illumination: This is suitable for transparent samples. It has good contrast and enough color information.
- Oblique Transmitted Illumination: For nearly translucent and colorless samples, use oblique transmitted lighting. The sample's contrast and visual clarity can be enhanced.
- Darkfield Illumination: Darkfield lighting can reveal minuscule details on flat surfaces that are difficult to discern with brightfield, such as fractures, pores, and fine protrusions on shiny or bright materials. It can also be used to reveal sample structures whose size falls below the resolution limit.
Deep Dive: Ergonomics
In More Detail: Ergonomics for the Best Results
The physical characteristics and work habits of individuals vary greatly. As a result, the height of a microscope's eyepieces may not be appropriate for all users.
If the viewing height is too low, observers will have to bend forward while working, which can cause muscular neck strain.7 To account for these height discrepancies, a variable binocular tube is recommended.7
Leica Microsystems provides a wide selection of ergonomic accessories to help maintain workflow efficiency.
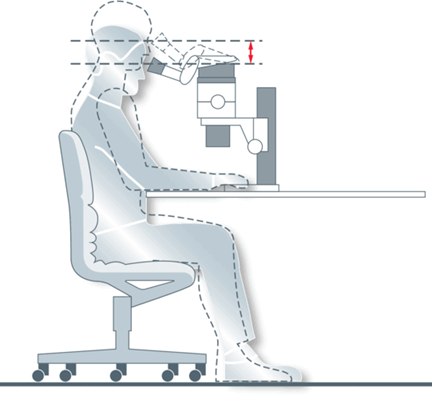
Figure 3. The ErgoTube eyepiece tubes allow users to keep the body and head in a relaxed position with the arms well supported, have adequate space for the legs, and sit comfortably in a chair. Image Credit: Leica Microsystems GmbH
References
- Rottermann, R. and Bauer, P. (2010). Depth of Field in Microscopy. Leica Microsystems. (online) Available at: https://www.leica-microsystems.com/science-lab/microscopy-basics/depth-of-field-in-microscopy/.
- Wilson, M., DeRose, J. and Greb, C. (2023). Microscope Resolution: Concepts, Factors and Calculation. Leica Microsystems. (online) Available at: https://www.leica-microsystems.com/science-lab/life-science/microscope-resolution-concepts-factors-and-calculation/.
- Wilson, M. (2017). Collecting Light: The Importance of Numerical Aperture in Microscopy. Leica Microsystems. (online) Available at: https://www.leica-microsystems.com/science-lab/microscopy-basics/collecting-light-the-importance-of-numerical-aperture-in-microscopy/.
- Goeggel, D., et al. (2023). What is the FusionOptics Technology? (online) Leica Microsystems. Available at: https://www.leica-microsystems.com/science-lab/industrial/fusionoptics-combines-high-resolution-and-depth-of-field-for-ideal-3d-optical-images/.
- Wilson, M. (2017). Eyepieces, Objectives and Optical Aberrations. Leica Microsystems. (online) Available at: https://www.leica-microsystems.com/science-lab/microscopy-basics/eyepieces-objectives-and-optical-aberrations/.
- DeRose, J. and Doppler, M. (2023). Microscope Illumination for Industrial Applications. (online) Leica Microsystems. Available at: https://www.leica-microsystems.com/science-lab/industrial/microscope-illumination-for-industrial-applications/.
- Müller, C. (2023). Microscope Ergonomics. (online) Leica Microsystems. Available at: https://www.leica-microsystems.com/science-lab/industrial/microscope-ergonomics/.
- DeRose, J. and Doppler, M. (2023). Understanding Clearly the Magnification of Microscopy. (online) Leica Microsystems. Available at: https://www.leica-microsystems.com/science-lab/industrial/understanding-clearly-the-magnification-of-microscopy/.
- ISO 19012-1:2013: Microscopes - Designation of microscope objectives - Part 1: Flatness of field/Plan, International Organization for Standardization. (online) ISO. Available at: https://www.iso.org/standard/61652.html.
- ISO 19012-2:2013: Microscopes - Designation of microscope objectives - Part 2: Chromatic correction, International Organization for Standardization. (online) ISO. Available at: https://www.iso.org/standard/61836.html.

This information has been sourced, reviewed, and adapted from materials provided by Leica Microsystems GmbH.
For more information on this source, please visit Leica Microsystems GmbH.