Plastic Injection Moulding - An Introduction

Topics Covered

Introduction

One of the most common methods of converting plastics from the raw material form to an article of use is the process of injection moulding. This process is most typically used for thermoplastic materials which may be successively melted, reshaped and cooled. Injection moulded components are a feature of almost every functional manufactured article in the modern world, from automotive products through to food packaging. This versatile process allows us to produce high quality, simple or complex components on a fully automated basis at high speed with materials that have changed the face of manufacturing technology over the last 50 years or so.

Historical Background

To understand the engineering and operation of modern day injection moulding machines, it is useful to first look at the not too distant origins of the process. The first injection moulding machines were based around pressure die casting technology used for metals processing, with patents registered in the USA in the 1870's specifically for celluloid processing. Further major industrial developments did not occur until the 1920's when a series of hand operated machines were produced in Germany to process thermoplastic materials. A simple lever arrangement was used to clamp a two piece mould together. Molten plastic was then injected into the mould to produce the moulded component. Being an inherently low pressure process, it was limited in use. Pneumatic cylinders were added to the machine design to close the mould, although little improvement was made. Hydraulic systems were first applied to injection moulding machinery in the late 1930's as a wider range of materials became available, although the machine design was still largely related to die casting technology.

Large-scale development of injection moulding machinery design towards the machines we know today did not occur until the 1950's in Germany. Earlier machines were based on a simple plunger arrangement to force the material into the mould, although these machines soon became inadequate as materials became more advanced and processing requirements became more complex. The main problem with a straightforward plunger arrangement was that no melt mixing or homogenisation could be readily imparted to the thermoplastic material. This was exacerbated by the poor heat transfer properties of a polymeric material. One of the most important developments in machine design to overcome this problem, which still applies to modern processing equipment today, was the introduction to the injection barrel of a plunging helical screw arrangement. The machine subsequently became known as a 'Reciprocating Screw' injection moulding machine.

The Injection Moulding Cycle

The modern day process has developed and matured significantly to the level where fully automated, closed loop, microprocessor controlled machines are the 'norm', although in principle injection moulding is still a relatively simple process. Thermoplastic injection moulding requires the transfer of the polymeric material in powder or granule form from a feed hopper to a heated barrel. In the barrel, the thermoplastic is melted and then injected into a mould with some form of plunger arrangement. The mould is clamped shut under pressure within a platen arrangement and is held at a temperature well below the thermoplastic melt point. The molten thermoplastic solidifies quickly within the mould, allowing ejection of the component after a pre determined period of cooling time. The basic injection moulding process steps with a reciprocating screw machine are as follows.

Mould Close and Clamping

The mould is closed within the platen arrangement and clamped using necessary force to hold the mould shut during the plastic injection cycle, thus preventing plastic leakage over the face of the mould. Present day moulding machines range from around 15 to 4,000 metric tonnes available clamping force (150 to 4000 kN).

Many systems are available for opening/closing and clamping of mould tools, although usually they are of two general types. Direct Hydraulic Lock is a system where the moving machine platen is driven by a hydraulic piston arrangement which also generates the required force to keep the mould shut during the injection operation. Alternatively, smaller auxiliary pistons may be used to carry out the main movement of the platen and a mechanical blocking arrangement is used to transfer locking pressure from a pressure intensifier at the rear of the machine, which moves only by a few millimetres, through to the platen and tool.

The second type of general clamping arrangement is referred to as the Toggle Lock. In this case a mechanical toggle device, which is connected to the rear of the moving platen, is actuated by a relatively small hydraulic cylinder, this provides platen movement and also clamping force when the toggle joint is finally locked over rather like a knuckle arrangement.

Injection

At this stage in the machine cycle the helical form injection screw (Figure 1) is in a 'screwed back' position with a charge of molten thermoplastic material in front of the screw tip roughly equivalent to or slightly larger than that amount of molten material required to fill the mould cavity. Injection moulding screws are generally designed with length to diameter ratios in the region of 15:1 to 20:1, and compression ratios from rear to front of around 2 : 1 to 4 : 1 in order to allow for the gradual densification of the thermoplastic material as it melts. A check valve is fitted to the front of the screw such as to let material pass through in front of the screw tip on metering (material dosing), but not allow material to flow back over the screw flights on injection. The screw is contained within a barrel which has a hardened abrasion resistant inner surface.

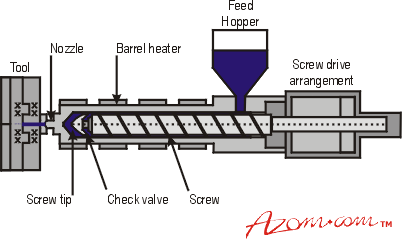
Figure 1. Reciprocating screw injection moulding unit

Normally, ceramic resistance heaters are fitted around the barrel wall, these are used to primarily heat the thermoplastic material in the barrel to the required processing temperature and make up for heat loss through the barrel wall, due to the fact that, during processing most of the heat required for processing is generated through shear imparted by the screw. Thermocouple pockets are machined deep into the barrel wall so as to provide a reasonable indication of melt temperature. Heat input can therefore be closed loop controlled with a Proportional Integral and Derivative (PID) system. The screw (non-rotating) is driven forward under hydraulic pressure to discharge the thermoplastic material out of the injection barrel through the injection nozzle, which forms an interface between barrel and mould, and into the moulding tool itself.

Holding Pressure and Cooling

The screw is held in the forward position for a set period of time, usually with a molten 'cushion' of thermoplastic material in front of the screw tip such that a 'holding' pressure may be maintained on the solidifying material within the mould, thus allowing compensating material to enter the mould as the moulded part solidifies and shrinks. Holding pressure may be initiated by one of three methods: by a set time in seconds from the start of the injection fill phase; by the position of the screw in millimetres from the end of injection stroke; or by the rise in hydraulic pressure as measured by a pressure transducer in the mould itself or in the injection hydraulic system.

As the material solidifies to a point where hold pressure no longer has an effect on the mould packing, the hold pressure may be decayed to zero, this will help minimise residual stresses in the resultant moulding. Once the hold pressure phase has been terminated the mould must be held shut for a set period of cooling time. This time allows the heat in the moulding to dissipate into the mould tool such that the moulding temperature falls to a level where the moulding can be ejected from the mould without excessive distortion or shrinkage. This usually requires the moulding to fall to a temperature below the rubbery transition temperature of the thermoplastic or Tg (glass transition temperature). Depending on the type of plastic this can be within a few degrees or over a temperature range. Mould temperature control is incorporated into the tool usually via channels for pressurised water flow. The mould may be connected to a cooling unit or water heater depending on the material being processed, type of component and production rate required.

Material Dosing or Metering

During the cooling phase, the barrel is recharged with material for the next moulding cycle. The injection screw rotates and, due to its helical nature, material in granule or powder form is drawn into the rear end of the barrel from a hopper feed. The throat connecting the hopper to the injection barrel is usually water cooled to prevent early melting and subsequent material bridging giving a disruption of feed. The screw rotation speed is usually set in rpm which is measured using a proximity switch at the rear of the screw. Screw rotation may be set as one constant speed throughout metering or as several speed stages.

The material is gradually transferred forward over the screw flights and progressively melted such that when it arrives in front of the screw tip it should be fully molten and homogenised. The molten material transferred in front of the tip progressively pushes the screw back until the required shot size is reached. Increased shear is imparted to the material by restricting the backward movement of the screw, this is done by restricting the flow of hydraulic fluid leaving the injection cylinder. This is referred to as `back pressure' and it helps to homogenise the material and reduce the possibility of unmelted material transferring to the front of the screw.

Mould Open and Part Ejection

When the cooling phase is complete the mould is opened and the moulding is ejected. This is usually carried out with ejector pins in the tool which are coupled via an ejector plate to a hydraulic actuator, or by an air operated ejector valve on the face of the mould tool. The moulding may free fall into a collection box or onto a transfer conveyer, or may be removed by an automatic robot. In this latter case the moulding cycle is fully automatic. In semi-automatic mode, the operator may intervene at this point in the cycle to remove the moulding manually. Once the moulding is clear from the mould tool, the complete moulding cycle can be repeated.

Mould Design

Mould design is in itself an extremely diverse and complicated subject. However, it is useful to understand basic design features and construction of simple injection mould tools (figure 2).

Figure 2. Typical mould tool arrangement.

In this case the mould simply consists of two halves commonly referred to as the moving (core) half and fixed (cavity) half. Starting from the injection side, a location ring is fitted to the back of the rear backing plate, this locates and centralises the mould into the fixed platen. Through the locating ring a sprue bush can be seen. The sprue bush is profiled with a radius to match up with the injection unit nozzle so that material can be directly transferred from the injection unit through to the mould cavity. In the case of a single impression (cavity) mould, the sprue may feed directly onto the component, in the case of a multi impression mould, the sprue feeds onto a runner system machined into the tool face that acts as a transfer system to the cavity for the molten material. Heated or hot runner systems may be incorporated in the fixed half of the mould such that the sprue and runner feed system is constantly molten and therefore not ejected at the end of the cycle. Instead the molten material remaining in the hot runner system after injection of a component forms part of the next shot. Many different types of gating may be used to connect the runner system to the mould cavities. Gates are preferably as small as possible in order to minimise the potential ‘witness’ mark on the component. It can be seen that a sprue and a cavity form in the mould creates the component shape, these may be machined directly into solid steel or aluminium plates, or made separately as inserts which may be subsequently fitted to the core and cavity supporting plates. In this particular example, hardened pins are used to eject the components from the mould, these are fixed into a rear ejector plate which is connected to a hydraulic actuator behind the moving platen. A profiled ejector pin behind the sprue bush ensures separation of sprue from sprue bush when the mould opens and aids ejection of the runner system. Cooling channels are machined into the core and cavity plates in order to remove the process heat from the tool. The complete tool is held together with a system of spacer blocks, bolster and backing plates such that it may be bolted directly to the machine platens and is completely rigid and able to resist injection forces.

Injection Moulding Machine Selection Criteria

Machine selection, particularly for a range of component types can be quite difficult. It is always wise to talk to machine suppliers in depth regarding overall machine specifications. Rough guidelines do however exist to enable an estimation of machine type and size required.

The Mould

The mould must fit within the available clamping area. This is usually determined by the tie bar spacing on the machine restricting mould fitting and removal. Some machines have retractable tie bars to assist mould changing. The clamp stroke available must be able to accommodate the mould height or depth of mould and the required opening stroke needed to eject the plastic component. For free fall ejection, the daylight between platens must be greater than mould height plus twice the depth of component to be ejected. It must be noted that this dimension will need to be considerably greater if for instance, the component is removed by a robot, so as to allow access for the removal head. It is always wise to allow plenty of room for manoeuvre for later machine flexibility.

The Clamping Unit

The clamping unit must be able to supply enough locking force to keep the mould shut during the injection phase, otherwise the mould will part and molten material will flash over the mould split line. As a rough guide of thumb, parts with thin wall sections and deep draw depths require approximately 3-4 tonnes per square inch or 0.5-0.6 tonnes/cm2, and parts with thick wall sections and shallow draw depths require approximately 2 tonnes per square inch or 0.3 tonnes/cm2. To calculate the locking force required for a particular component, this value must be multiplied by the projected area of the component to obtain an overall value in tonnes. The projected area of a component is taken as one side of the moulding only, perpendicular to the injection unit as oriented in the mould. For instance, a simple box housing of 3 mm wall section having a top surface area of 120 cm2 will require at least 120 x 0.3 = 36 tonnes of locking force.

The Injection Unit

The injection unit must be capable of supplying the component shot weight (including the sprue and runner system). The total shot weight should not exceed 90% of the injection capacity of the machine. Injection capacities are usually quoted in grams of polystyrene at a specific gravity of 1.03 g cm-3. If it is intended to process another material, the injection unit shot weight should be recalculated using that particular material's specific gravity.

As metering or screw recovery must take place before cooling time has elapsed and the mould opens, the injection unit (size of screw) must be sized to allow this to happen. If recovery does not occur within the cooling period, the overall cycle time will be unnecessarily increased.

The maximum temperature possible on the barrel must be great enough to melt the type of plastic being processed.

The barrel and screw must be specially treated if particularly abrasive materials are to be processed, such as glass fibre filled polyamide (nylon). Also, the screw geometry must be correct for processing specific materials, although general purpose designs are available to cater for a range of commodity thermoplastics.

Moulding Quality

Thermoplastic mouldings may contain many defects which are a result of bad mould design, however, correct control of the injection moulding process itself usually plays the major part in achieving a good quality component. Basic part quality defects may be as follows.

Weld Lines

Weld lines are created when two or more cooling melt flow fronts meet within the mould. This can be recognised on a moulding as a hairline feature and occurs where melt flow has been divided around an obstacle in the tool, such as a boss pin, and rejoins on the other side. Weld lines locally reduce the mechanical properties of the material at that point and care should be taken to position gating such that weld lines are minimised. If they are unavoidable, they must be positioned in areas of least effect. Melt flow software packages are of great assistance in this area for complex mouldings. Modification of process conditions such as increasing melt temperature, mould temperature or injection speed may improve the situation but may create other problems.

Shrinkage

Shrinkage occurs as the thermoplastic cools in the mould. It is due, on a molecular level, to the polymer chains relaxing (recoiling) and aligning themselves with adjacent chains. Increased shrinkage occurs with more highly crystalline plastics (e.g. polybutylene terephthalate, PBT) due to the formation of more dense crystal structures. Sink marks may occur in plastic parts in areas of thicker cross section such as junctions between side wall and base where the plastic is slower to cool. Higher mould temperatures will allow the plastic to shrink more due to increased molecular energy and subsequent ability to recoil. Higher packing pressures may compensate, as shrinkage can be taken up with new melt (assuming the gate is still live).

Splash Marks

Splash marks occur as silver streaks on the moulding surface. If any moisture is present in the material, it is heated and conveyed into the mould cavity. At the point where material enters the cavity (gate) there is a sudden decompression of the material and the moisture will volatilise off causing the splash effect. This occurs particularly in moisture attractive thermoplastics such as nylon (polyamide, PA) and polyacetal (polyoxymethylene, POM).

Distortion and Moulded in Stress

Distortion and moulded in stress may occur in moulded components due to molecular chain orientation. As the polymer is forced along small channels or cross sections, the molecular chains become aligned and stretched. As the polymer cools, the molecules try to relax to their preferred coiled state. As the cooling process is generally fast, the extended molecular chains become 'frozen' in their uncoiled state. After moulding, the molecular chains still try to recoil and as a result the component may distort, particularly in the case of semi-flexible polymers such as polyethylene. With more rigid polymers, the distortion may not take place, however, the residual stress in the plastic will lead to a reduction in important material properties such as impact strength.


Primary author: Andrew Morris

Source: Materials Information Service, edited by Justin Furness.


For more information on Materials Information Service please visit The Institute of Materials.


Comments

  1. Tim Brown Tim Brown India says:

    Your post is very useful knowledge, there are many 3d printing Industries like Binashree manufacturing some product with the process of Plastic Injection Molding. In future this 3D printing technology going to take a best place in the World.

The opinions expressed here are the views of the writer and do not necessarily reflect the views and opinions of AZoM.com.

Tell Us What You Think

Do you have a review, update or anything you would like to add to this article?

Leave your feedback
Your comment type
Submit

While we only use edited and approved content for Azthena answers, it may on occasions provide incorrect responses. Please confirm any data provided with the related suppliers or authors. We do not provide medical advice, if you search for medical information you must always consult a medical professional before acting on any information provided.

Your questions, but not your email details will be shared with OpenAI and retained for 30 days in accordance with their privacy principles.

Please do not ask questions that use sensitive or confidential information.

Read the full Terms & Conditions.