Prusa Research has added new features to its edition of Slic3r software. To better prepare models for 3D printing, the Prusa update adds a Smooth Variable Layer Height tool in addition to improvements for removable supports.
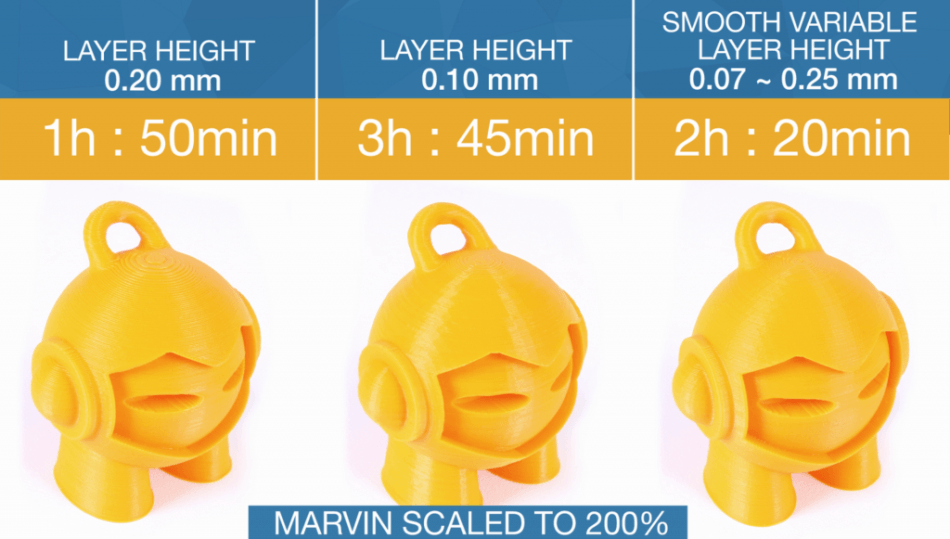 Comparison of a 3D printed 3D Hubs Marvin with thick, thin and variable layer heights. Image via Prusa Research
In an article on the Prusa3D blog, co-founder Josef Průša explains how Smooth Variable Layer Height is “the star of the show,” in this release, delivering a much needed control over the finish of FFF 3D prints to Makers, adding that “3D printing is always about the quality versus the print time.”
Getting a smooth finish where it matters without significant costs to time
In typical slices of 3D models, layers are set to the same height, i.e. 0.20 mm, o.10mm etc. Generally, the thicker the layer is, the speedier an object is to 3D print, but this comes with sacrifices to the finish of some areas in the 3D print.
Using a 3D printed Marvin model (available from 3D Hubs on Thingiverse) as an example, Průša points out that while the lower layers show few ridges on the surface, the finish at the top receives “an ugly staircase effect.”
With thinner layers, a model achieves a higher quality finish, but this comes at a significant cost to time. In the example put forward by Prusa, the 0.10mm layer height Marvin takes almost twice the amount of time to 3D print than one with 0.20mm layers.
The Smooth Variable Layer Height tool combines these two features so users can smooth down noticeable areas without losing out on so much time.
Experimenting with the smooth layers
Though varied layer height is not an entirely new idea, the way it is integrated into Slic3r Prusa Edition is certainly refreshing.
Rather than a typical automated slice, layer thickness is entirely user-defined giving Makers a chance to experiment with a desired finish.
After taking the tool for a test drive ourselves, we found it easy to use and also incredibly satisfying. In the “Layer editing” option the layers of a 3D model is measured by a scale on the right. Users then determine the smoothness, seen in real time, by stretching out a purple line preset (again by the user) to the standard height. By moving this line users can make layers both thinner (marked green) and thicker (marked red) if needed.
The feature has been developed with the Prusa i3 MK2 3D printer in mind, but Slic3r Prusa Edition can be setup with a number of G-code flavors to try out on other 3D printers.
Post processing FFF 3D prints
Other recent work looking at the finish of FFF 3D prints tackles the issue from a post processing angle. Researchers from Waseda University in Japan have developed a pen-like device that can be used to smooth out the grooves found in plastic 3D prints. Additionally, UK based Additive Manufacturing Technologies Limited received a grant from the government’s innovation initiative for their PostPro3D software. Readers can also learn more about layer slicing and post processing in the 3D Printing Beginners guide.